
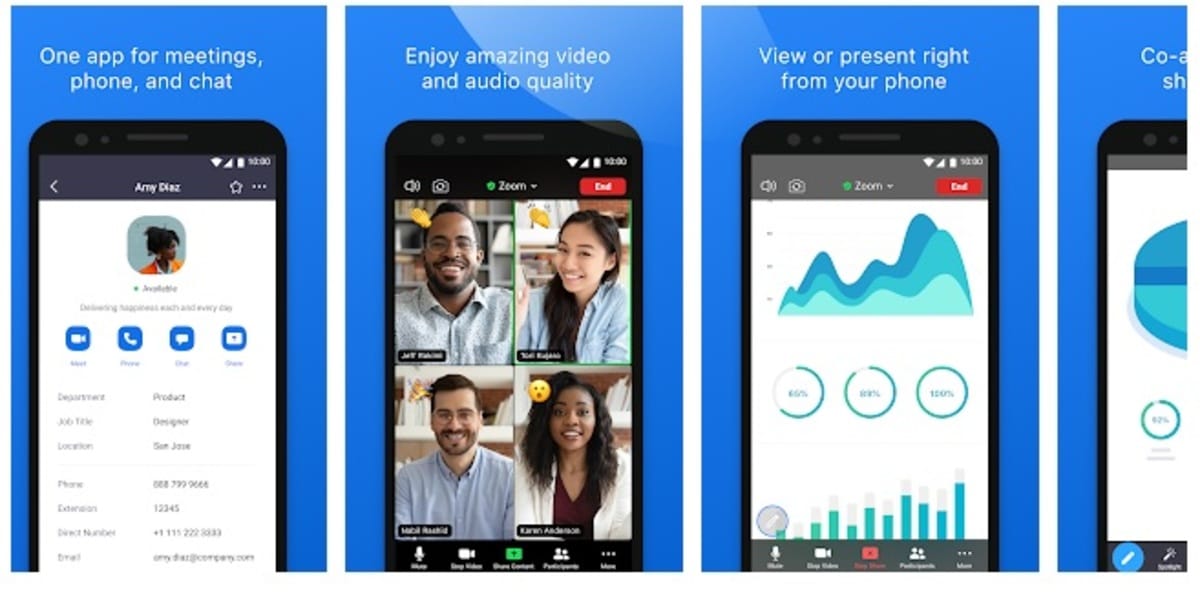
Zoom is one of the most popular apps in the world since 2020, due to the pandemic. Millions of people have been forced to work or study at home, and this app is one of the most popular ways to stay connected with other people in a stable and practical way. And the best thing is that you can install it on both a PC and a mobile device. Although it is very easy to use, there are always some doubts about it.
And one of the most common questions is how to turn on the microphone. Users may experience audio issues when making a video or Zoom call. In this article, we describe how to activate the microphone in Zoom at all times. If the microphone or audio is not working properly in the app, you can continue reading to understand what could be the problem and what its solution…


Audio requirements in Zoom
When making a video or Zoom call, the app requires a series of requirements to function properly, such as a certain bandwidth and network speed for communication, and also has its video and audio needs. To meet the audio requirements, you should keep in mind:
- Have a microphone on the device, either built-in or built into the headset.
- Speakers or headphones to be used for communication must be turned on.
It is essential to meet these two criteria in order to use the application on your device normally. If you do not meet any of these requirements, you will not be able to participate in a video call normally, in addition to trying to activate the microphone in Zoom you may have problems with the app's audio. In principle, these are very basic requirements that almost all mobile device users should meet, but sometimes problems arise.
How to activate the microphone in Zoom
Zoom is a popular video conferencing app that uses your Android smartphone's microphone to let you connect live with other people. You can organize virtual meetings with your friends and family if you download Zoom on your phone, give or receive classes remotely, hold work meetings, etc. But, yes, among the permissions that the application requests is access to the microphone, necessary for it to work correctly on your smartphone.
Despite having granted this permission to Zoom, the microphone may not be active when starting a virtual meeting, for example. Once you are in the virtual meeting room itself, you can activate the microphone. If the microphone is disabled when entering a meeting, nothing happens. This can be done on all devices (Android, iOS, PC and Mac) without any problem. And it is especially simple, despite the fact that many do not find the solution.
Whenever you want to join a Zoom meeting, you'll need to open meeting on your device (an Android mobile phone, tablet or computer). There will be a bar at the bottom of the screen offering options. The first option will be "Turn on audio". Click this button to activate your microphone on Zoom and speak normally in this meeting. Doing so will remove the red microphone icon with a stripe next to your name. Your microphone will now be activated and you will be able to speak normally in the app on Android.
Mute audio in meetings

Users can choose to mute their microphone in the event that they do not need to speak in a meeting, that is, when it is a chat in which one person speaks and the others are listeners. Or in case room noise interrupts a presentation. This feature of the app is used daily by many users to silence. That is, mute yourself in Zoom meetings the same way you mute yourself in the app. When we're in a Zoom meeting on our phone, we look at the options near the bottom of the screen to turn on our microphone. If we have already activated the audio, the Mute button will be the first option we see. To mute our microphone, just press the microphone icon with the line through it.
If you are the speaker of the meeting and the one who created the meeting, you can make sure there are no interruptions during your Zoom meeting by muting all or just some of the participants. This allows you to talk without being distracted, for example, without other people's noises that can be disturbing. The person who created the meeting will always see these settings in their account.
How to perform a sound check
In Zoom, we can speak and participate in the meeting as usual, activating the microphone. The app also has the possibility to perform a sound check, which is a good way to make sure that the sound quality works well and that we can participate in the meeting without problems. You can find this option in the app settings. The point of a sound check is to make sure that both microphones and speakers are working properly before the meeting starts, because once it starts you could miss out on what's going on in the meeting if something goes wrong, or worse, it could affect the other members if you ask them to wait for you to solve your problem. In this way, we will know that there will be no problems in the meeting, since we will only have to turn on the microphone if necessary. If something does not work in the sound check, we will be notified immediately to solve it.
To perform the sound test, you can follow these followed:
- Open Zoom.
- Go to the app settings.
- Locate the section called Audio. There you will find all the options related to the app's audio.
- Among the options there is one dedicated to the speaker and the microphone. These are the ones that will be used to perform the Zoom app sound input and output test.
- If you have chosen the speakers, a sound will be produced to verify that you are hearing it correctly. If you don't hear it, there is a problem with your speakers.
- In the case of the microphone, you will have to emit some noise that you can reproduce later to see if the recording has worked. If nothing has been recorded, there is likely a problem with your microphone.
Manage app permissions correctly

The Permissions are crucial for Zoom to work on Android devices. When we open the app, we are required to grant these permissions for it to work properly, if you reject them, you will run into functionality problems during its use. But do not worry, it is not something irreversible, you can recover them at any time. For example, if you denied permission to access the microphone they will not be able to hear you, but it can be reset.
The way to fix these types of app permission issues is to properly manage app permissions on your Android mobile device. To do this, you just have to do it as you would for any other app. The steps to follow are:
- Go to Settings of your Android.
- Go to the Applications section.
- Click on Permissions > Permissions.
- Now find the permission that you denied Zoom and that you want to grant, for example the Microphone permission. Click on Microphone in the list of permissions.
- Once inside you will see the apps that have access to the microphone and those that do not. Simply look for Zoom in the list and click on this entry.
- Then the options you can choose will appear:
- Allow only if the app is in use.
- Always ask.
- Do not allow.
- Choose the first option and you're done.
You should be able to join a meeting on your Android device if you've already set all necessary permits for the app. The microphone, speaker, and video should work fine in the app. It is possible that a problem with the microphone in Zoom is due to permissions, so we must check it at all times in our account.